Automated Email Backup Synology Tutorial
To ensure your email history is never at the mercy of a service provider's downtime or some human error, hosting an automated email backup solution on a Synology NAS is the most resilient approach. By using Mail Backup X within a containerized environment, you create a "set and forget" system that monitors your accounts in real-time and archives data to your local disks.
Email backup on a Synology NAS is most effective when it stops being a manual task and becomes an unattended system. The objective is not to export mailboxes once, but to establish an automated process that continuously backs up data, preserves historical data, and operates independently of any desktop computer or human intervention. This approach protects email data from account lockouts, human errors, provider-side outages, and long-term retention risks that are outside the user’s control.
Initializing the NAS Container Environment
On a Synology NAS, a container environment is what lets certain applications run in their own space, cut off from the rest of the system. You don’t install them into the operating system the way you would on Windows or macOS, they live inside this controlled workspace instead, so they don’t interfere with other services or files. The point of doing it this way is stability, easier updates, and the fact that the application keeps running in the background even when no computer is connected, as long as the NAS itself stays on.
On Synology NAS devices, this is called “Container Manager” (previously called “Docker”). If you don’t have it installed already, here’s how you can do it:
Log into your Synology DSM with an account that has administrative privileges. Then, launch the Package Center from the DSM desktop to access the Synology software repository.
Locate the search bar and type "Container Manager.” This application is the modern version of Docker for Synology and is required to run the Mail Backup X image. If you are on old NAS, search for “Docker” instead.
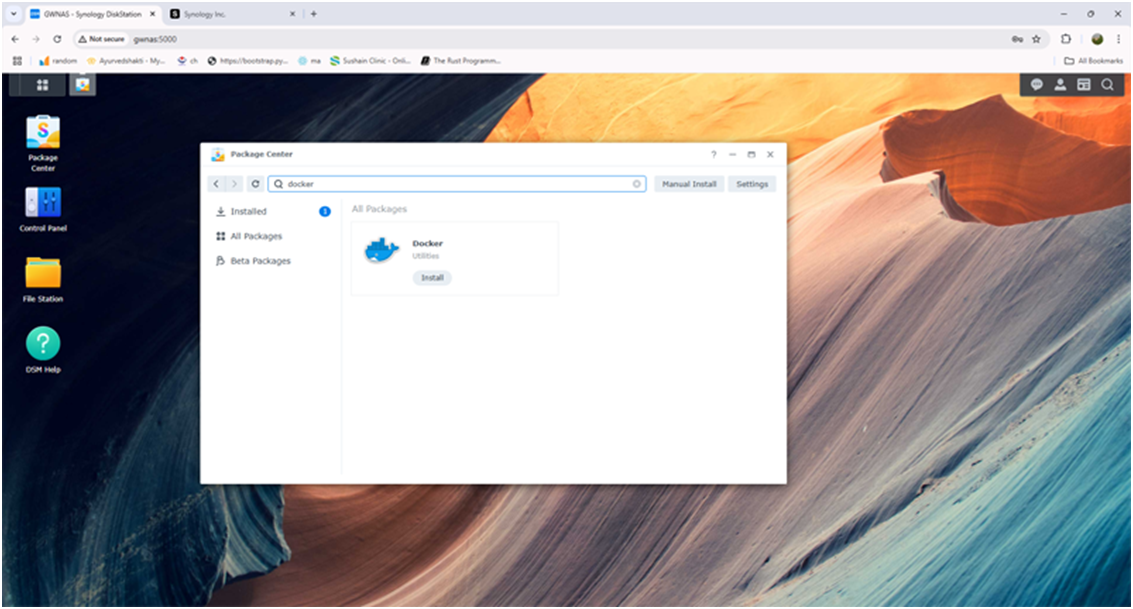
<Search-Docker-Package> Click the install button and wait for the system to download and initialize the package. Once complete, you will see it listed among your active applications inside the package center.
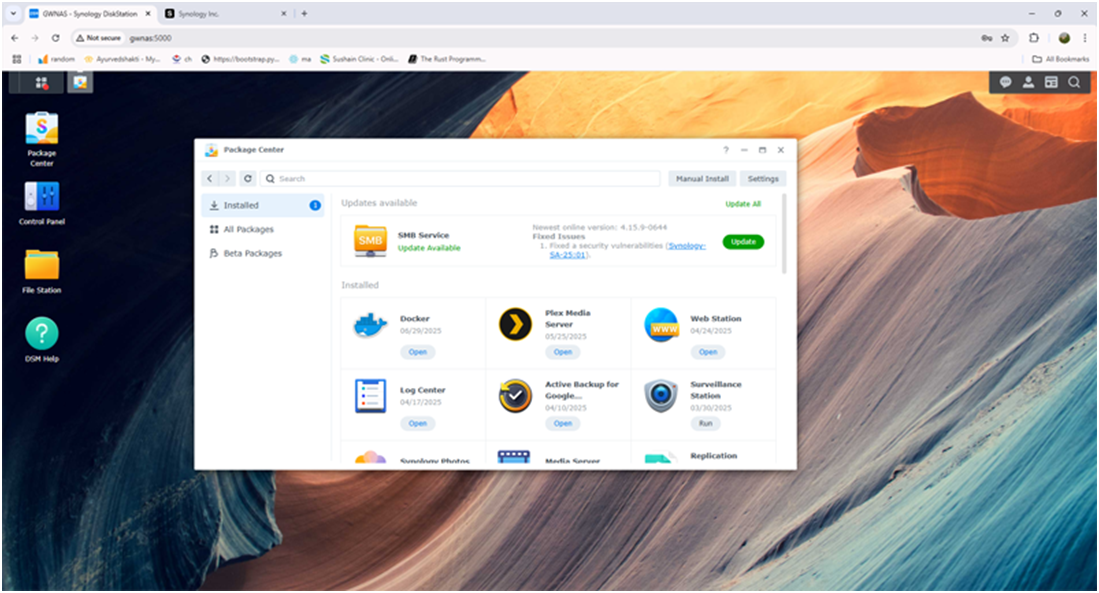
Getting the Mail Backup X Running inside the Container
With Container Manager (or docker) active, you need to get the Mail Backup X software image from the public registry to your NAS. Open Container Manager and navigate to the "Registry" tab on the left sidebar. Use the search field to find the official Mail Backup X image.After the image has finished downloading, switch to the "Image" tab to verify it is available for deployment.
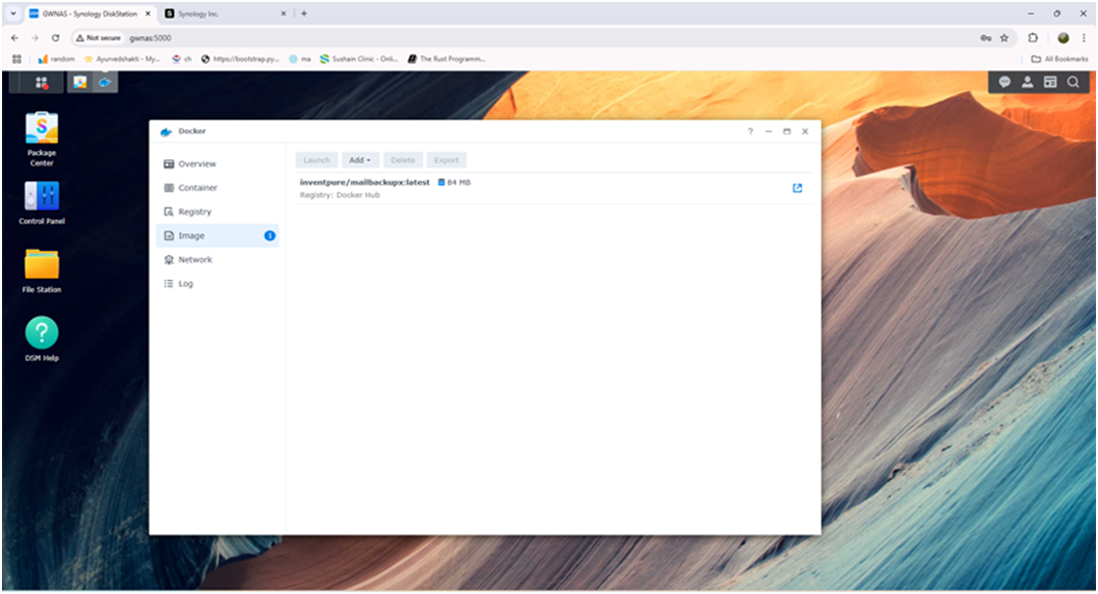
<Downloaded-Image-List> Select the image and click "Create" to launch the setup wizard. Start by naming the container, something like "mail-backup-x.” If you want, you can enable the "Enable resource limitation" checkbox. This is to prevent the Synology NAS email backup process from consuming all your NAS CPU power during high-volume syncs.
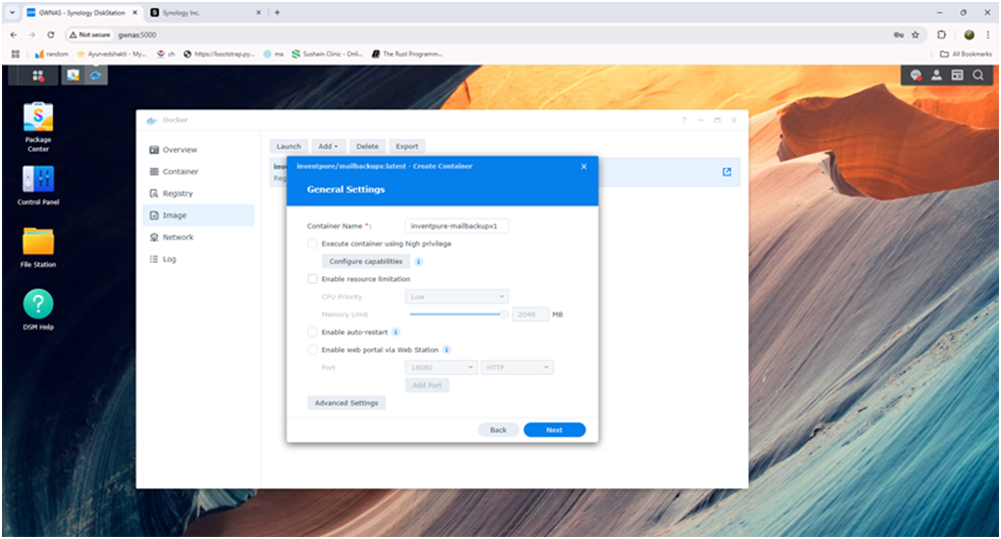
<Create-Container-General-Settings> The container needs a way to access the internet so it can connect to your email accounts and download messages. The bridge network allows it to do this by using the NAS’s existing network connection, without exposing or changing anything else on your system. To set this up, go to the Network settings and choose bridge as the network type.
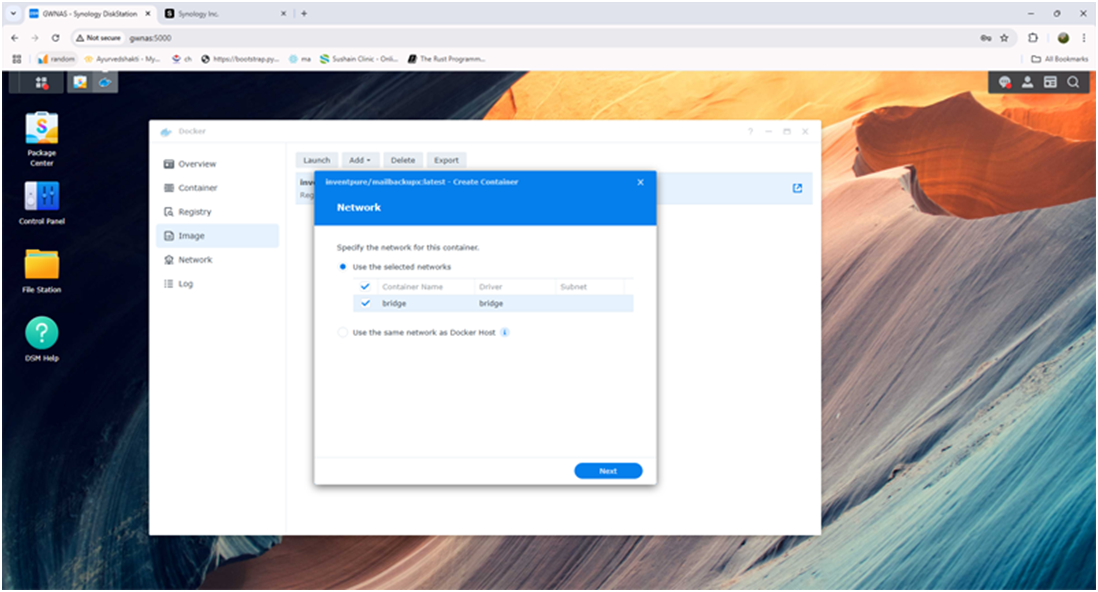
<Select-Network-Bridge> In the Port Settings, map a local port (for example, 18080) to the container’s internal web service port. This is the address you will type into your browser to manage your automated backups.
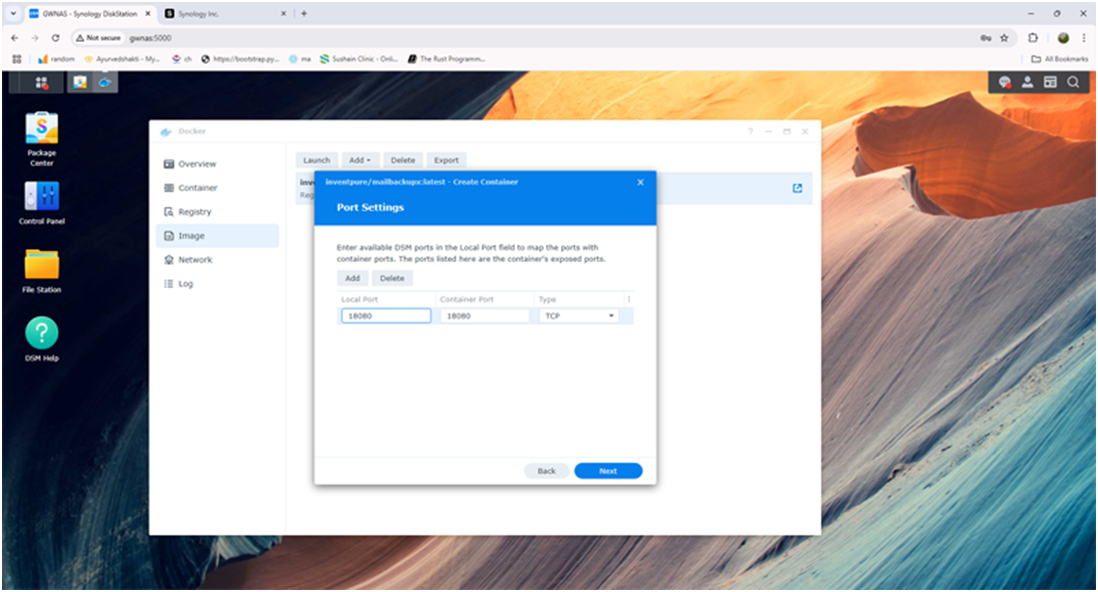
<Set-Port-Mapping>
Configuring Persistent Storage for Automation
A critical step for automation is ensuring that your email data is stored on your NAS hard drives rather than inside the temporary container memory. This guarantees that your archives remain intact even if the software is updated. Go to the Volume Settings section of the wizard and choose the option to add a folder.Navigate through your NAS file structure, select any existing folder, or create a new folder (recommended).
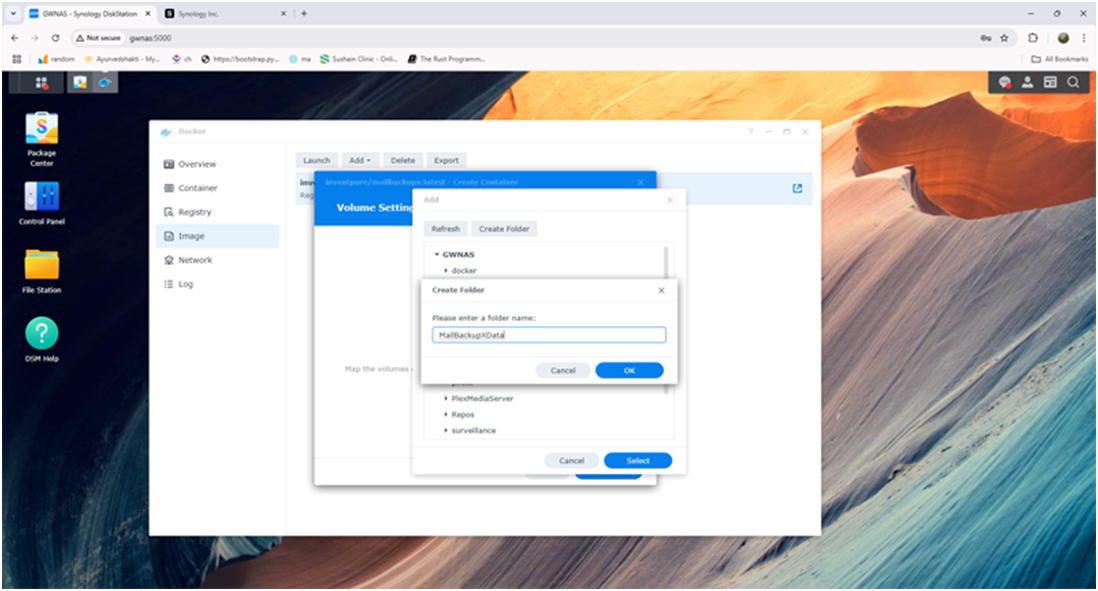
<Create-New-Backup-Folder> Select this new folder and map it to the internal path used by Mail Backup X for data storage. This ensures that every email fetched automatically is written directly to your NAS's redundant storage.
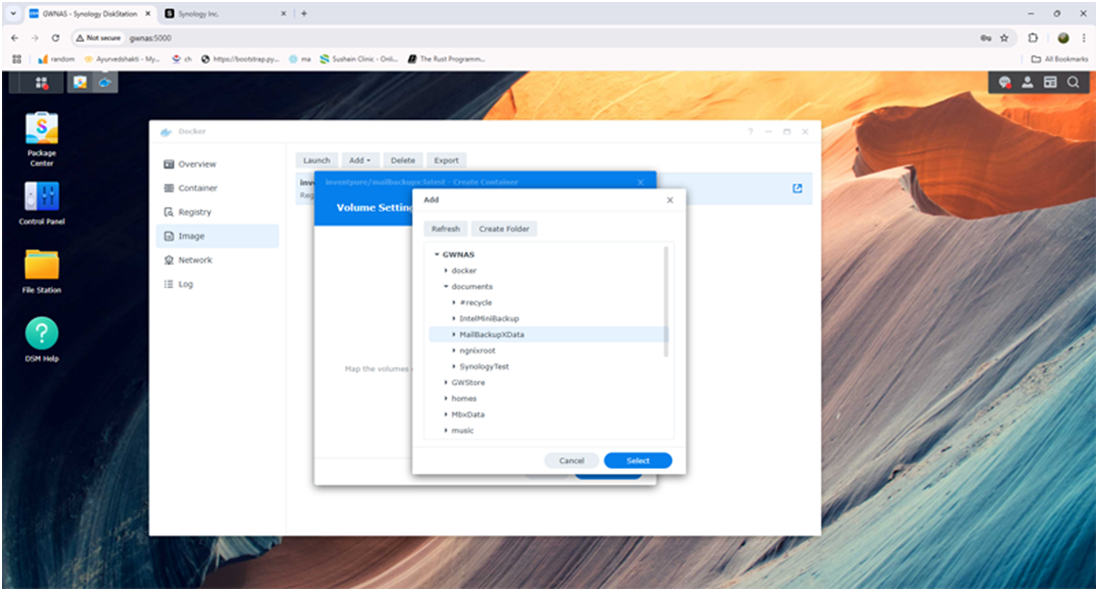
<Select-New-Backup-Folder> Review your configuration on the summary page. Ensure the "Run this container after the wizard is finished" box is checked, then click "Done."
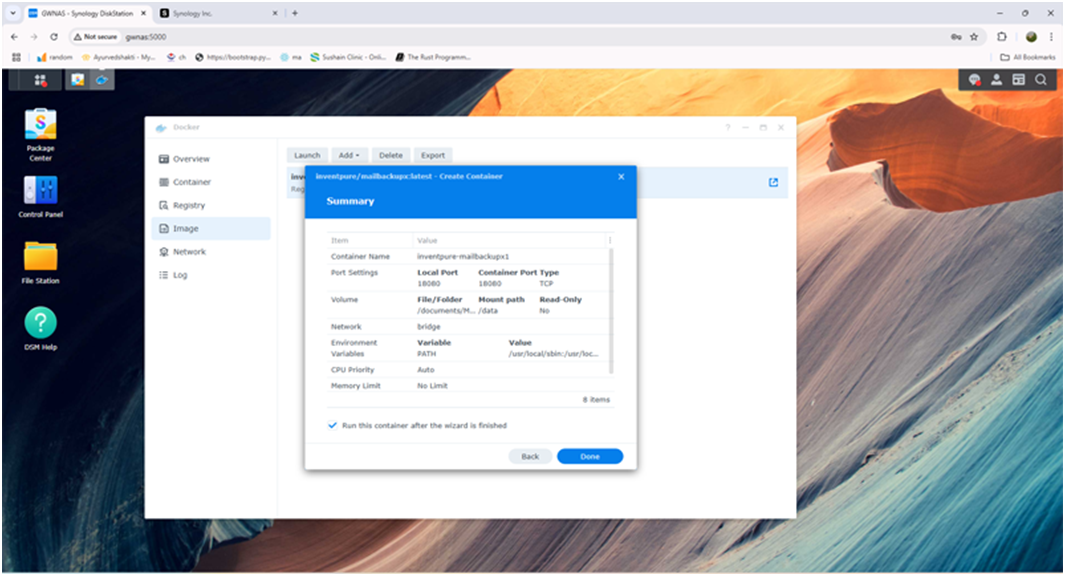
<Container-Summary-Review> Check the "Container" tab to verify the status icon is green, indicating the backup engine is live and ready for configuration.
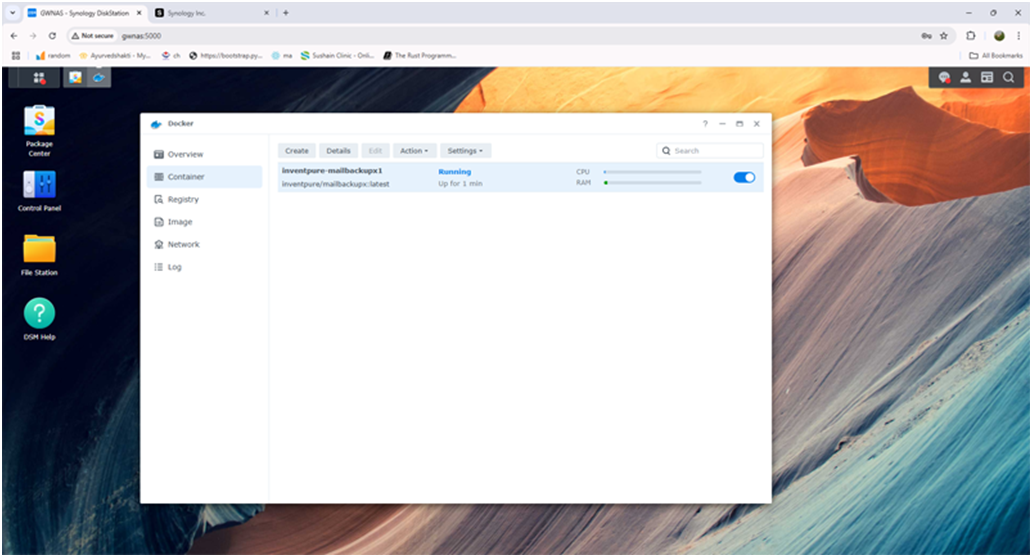
<Container-Running-Status>Licensing and Security Initialization With the engine running, you now need to access the web interface to configure your security credentials and activation. Open a new browser tab and enter your NAS IP address followed by the port you mapped earlier.
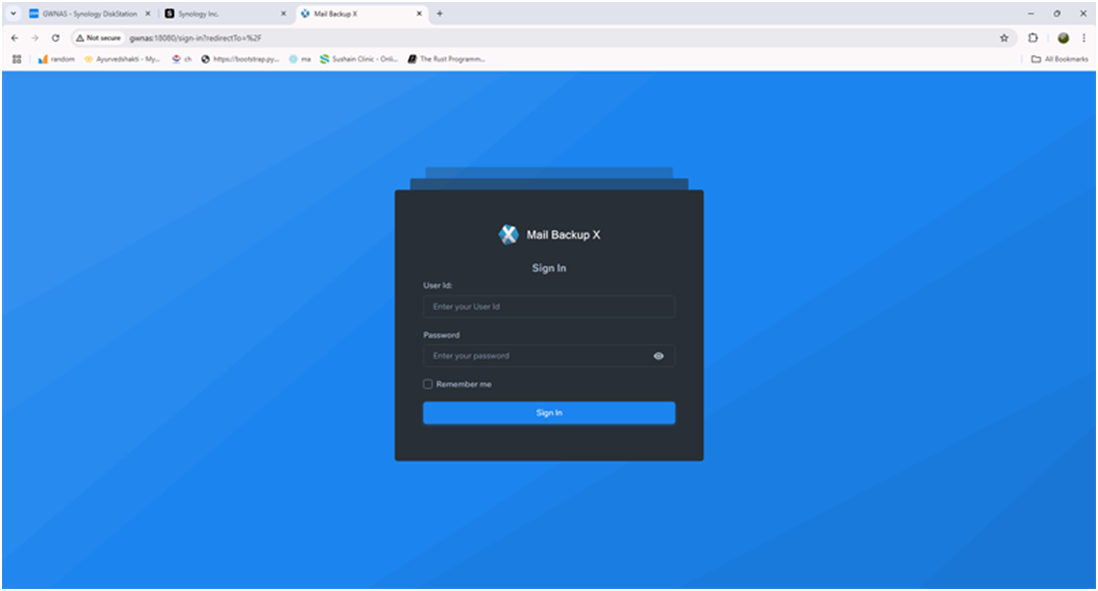
<Web-Login-Screen> The system will prompt you to change the default admin password. Choose a strong password, as this interface grants access to your entire email history.
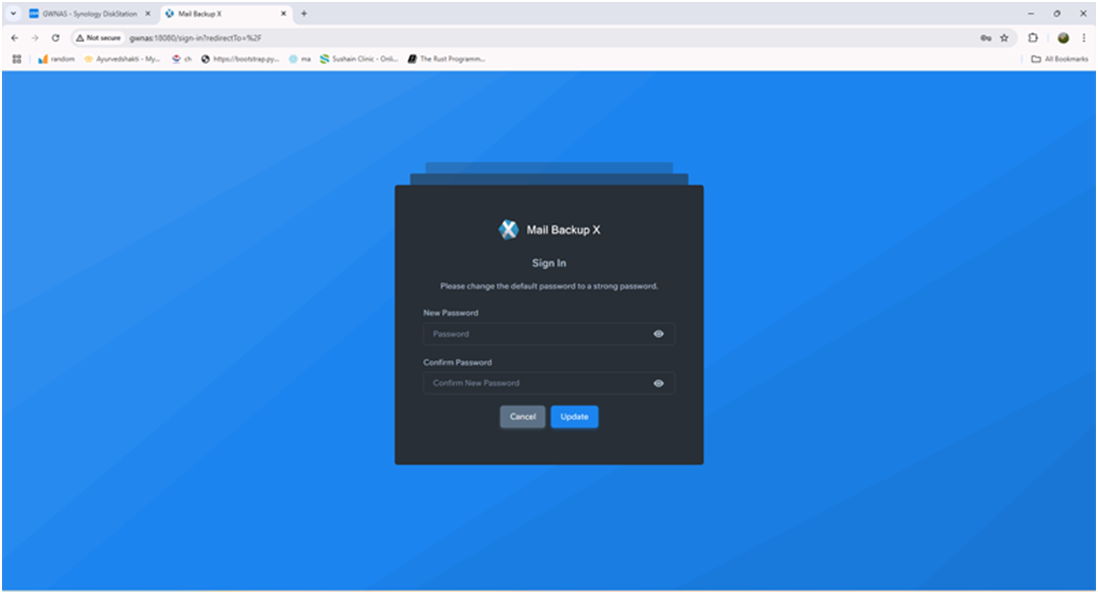
<Change-Default-Password> Select your activation method. If you are testing the automated features before committing, choose the trial activation.
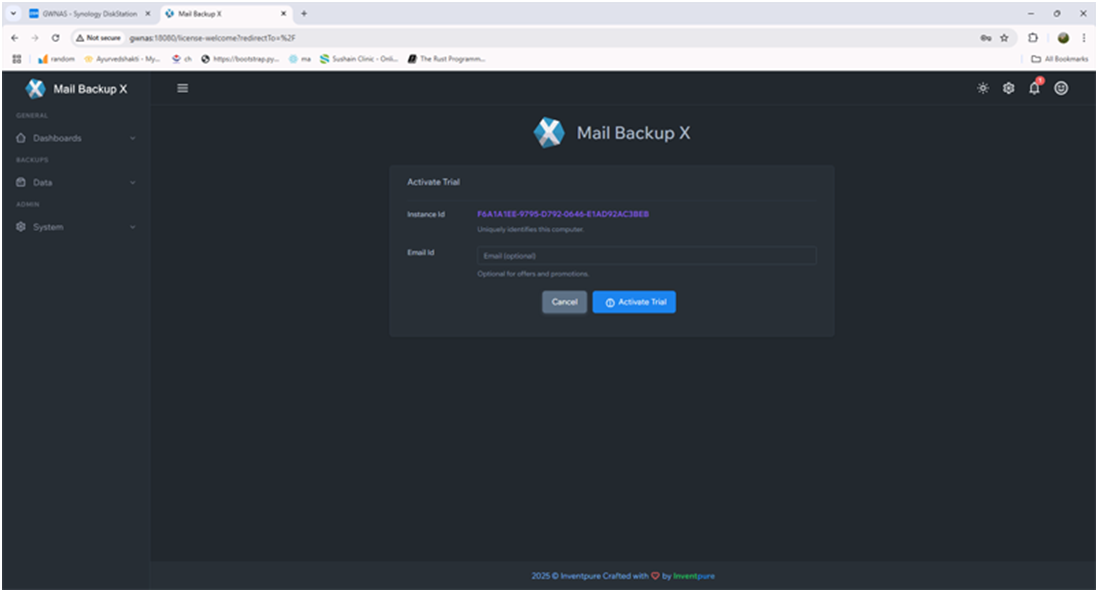
<Activate-Trial-Dialog>Establishing the Automated Backup Pipeline Mail Backup X uses a "Backup Profile" system to manage automation. You can set different rules for different accounts, allowing for varied backup frequencies based on the importance of the mailbox. If you are backing up a Gmail or Google Workspace account, you must first install the OAuth Helper extension in your browser to allow the NAS to authenticate securely without storing your primary password.
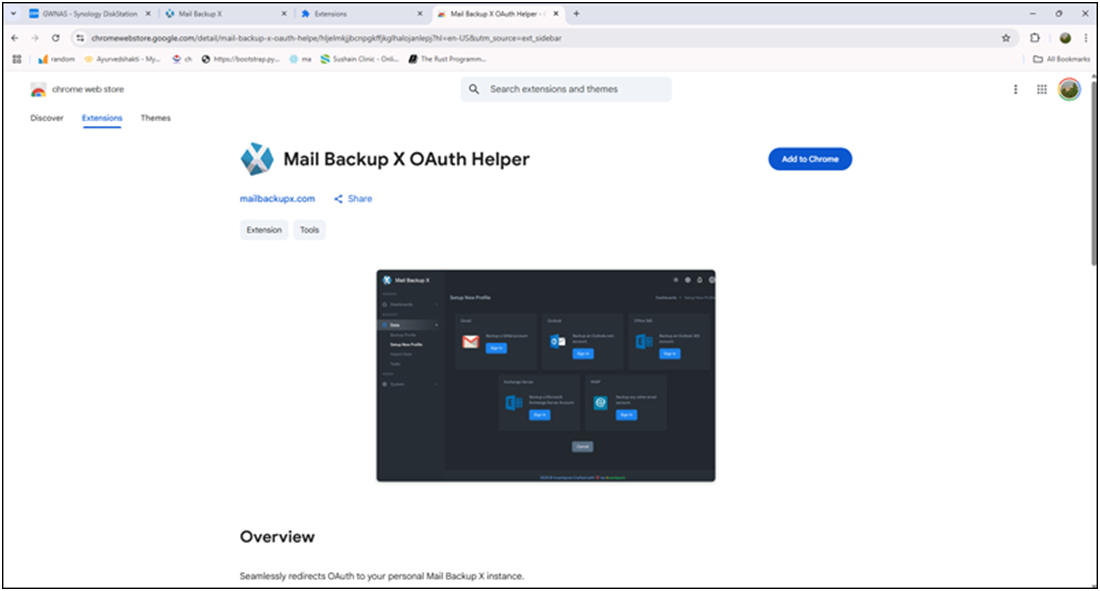
<OAuth-Helper-Extension-Page> Return to the Mail Backup X dashboard and click "Setup a New Backup Profile."
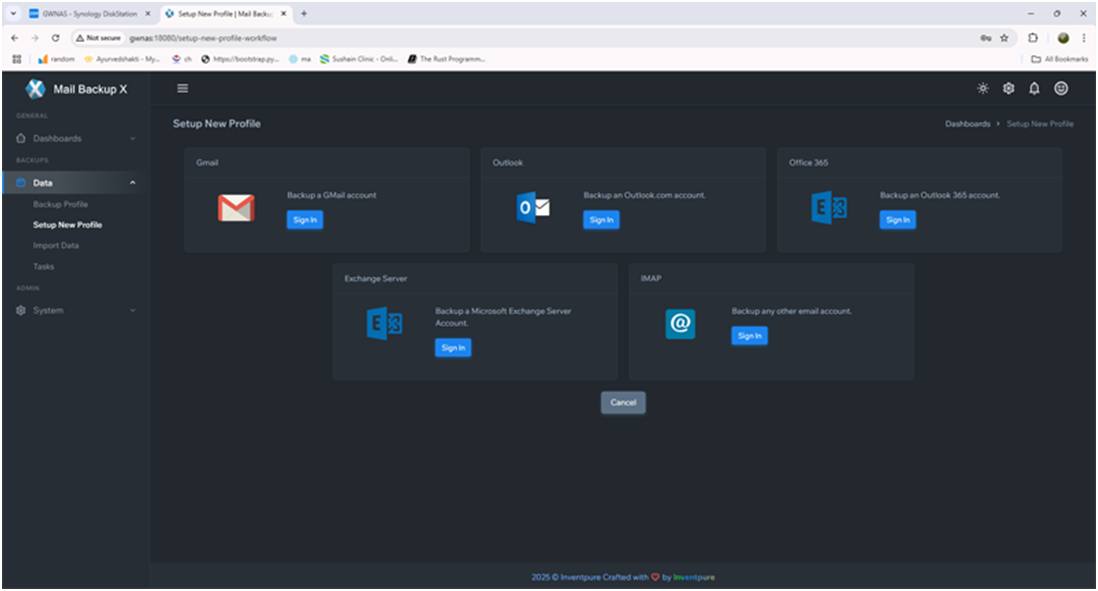
<Setup-New-Profile-Options> Choose your provider. For Gmail, the system will use the OAuth Helper to open a secure Google login window where you grant the NAS permission to access your mail.
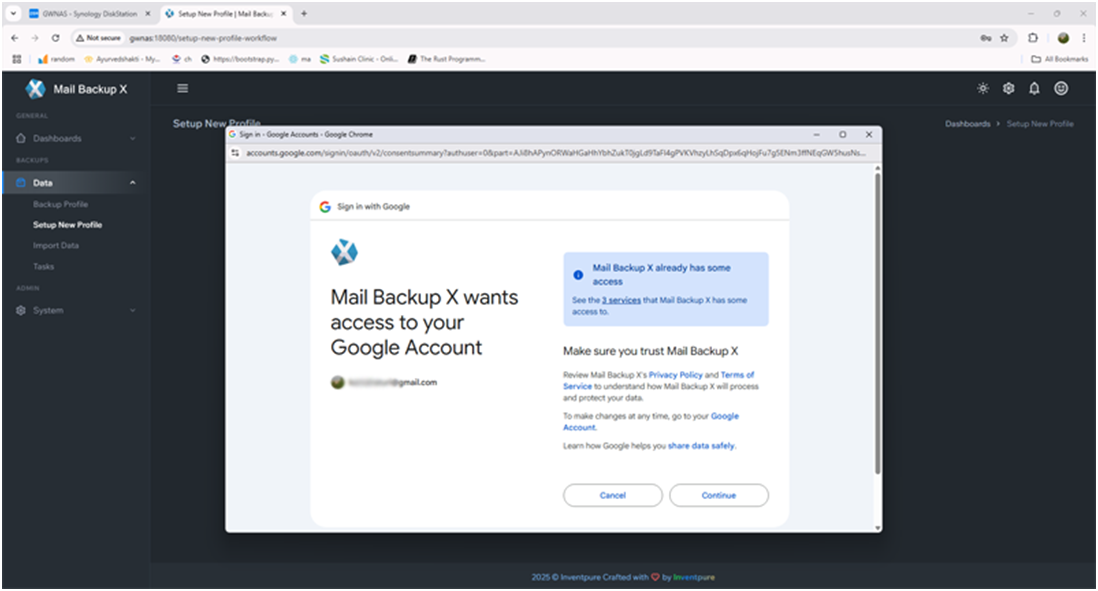
<Grant-Gmail-Access> In the configuration screen, define your automation parameters. You can choose "Continuous" backup, which monitors for new mail every few minutes, or "Scheduled" backup, which runs at specific times of the day.
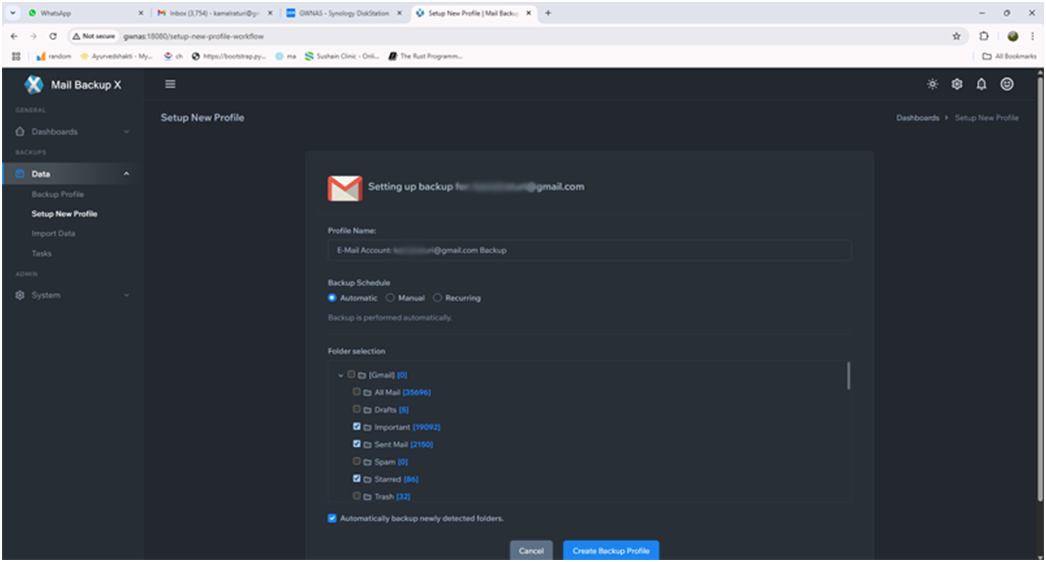
<Configure-Backup-Folders> Once you save the profile, the NAS will begin the initial ingestion of your mail. This process is fully automated; you can close your browser, and the NAS will continue to download the data in the background.
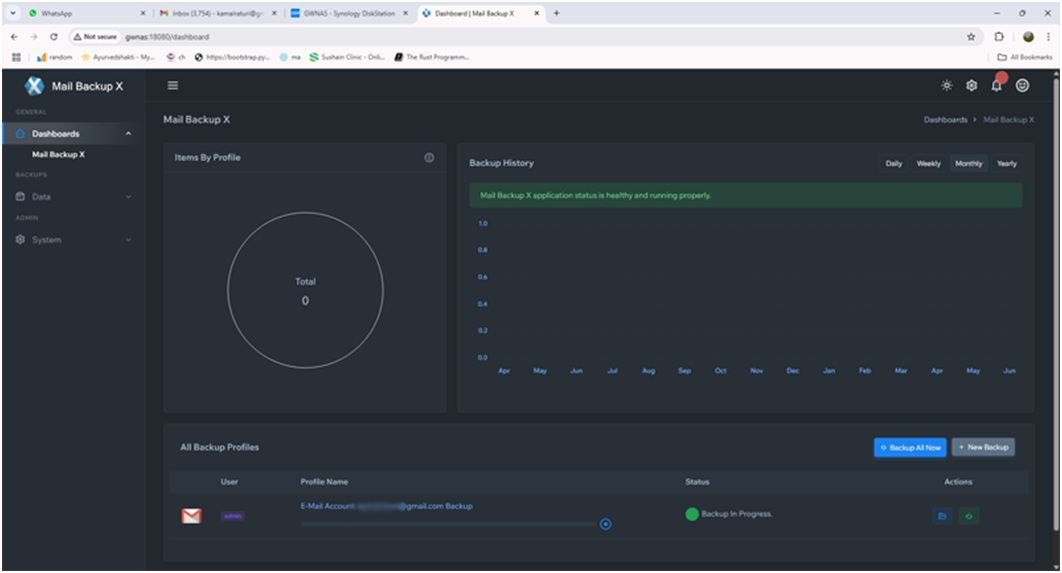
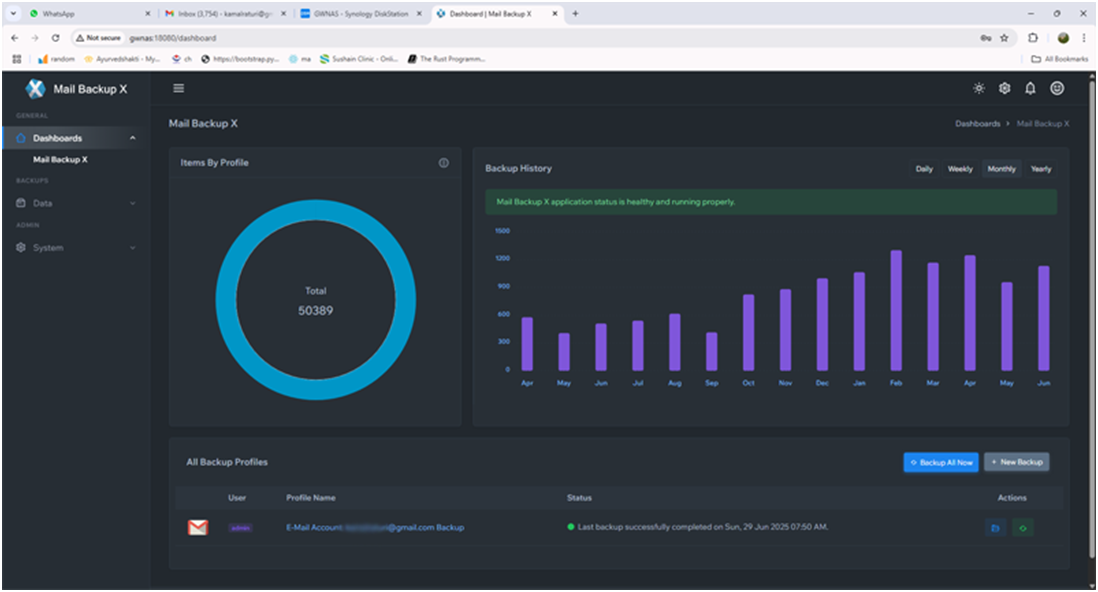
<Backup-In-Progress>Verifying Archive Integrity and Logs The value of an automated email backup system for Synology lies in its reliability. You should periodically check the dashboard to ensure the tasks are running as scheduled. View the active dashboard to see a high-level summary of your backup health, including the total number of emails backed up and the space saved through data compression.
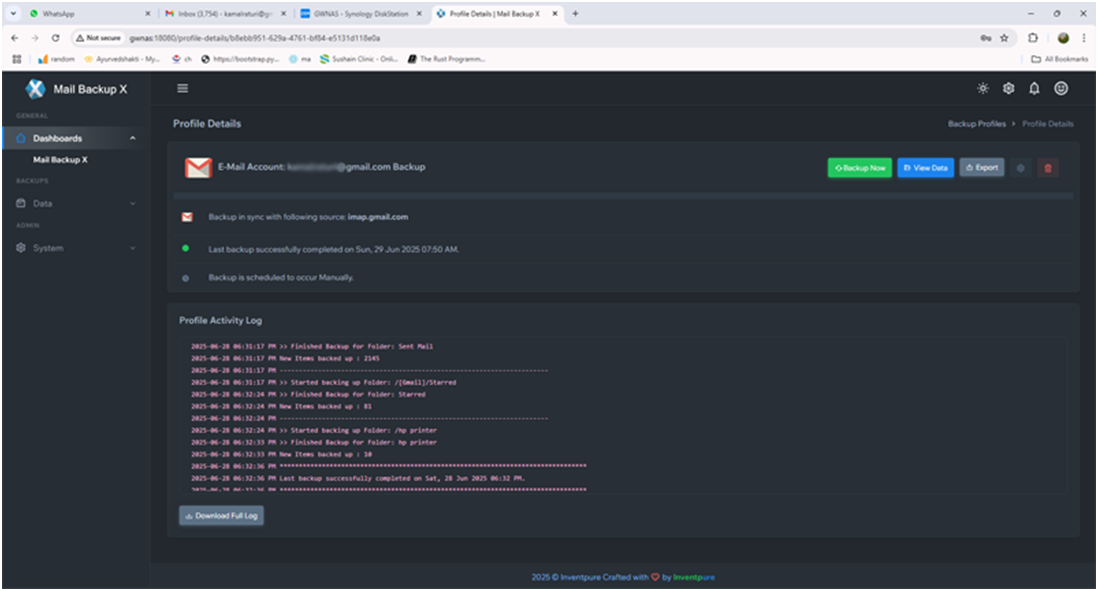
<Active-Dashboard-View> Select a specific profile to view its detailed history. This view confirms exactly when the last automated sync occurred and if any errors were encountered during the process.
<Profile-Details-View> Use the built-in viewer to search through the archived emails. This allows you to verify that the NAS is capturing all folders, including Sent items and Attachments, in their original formatting.
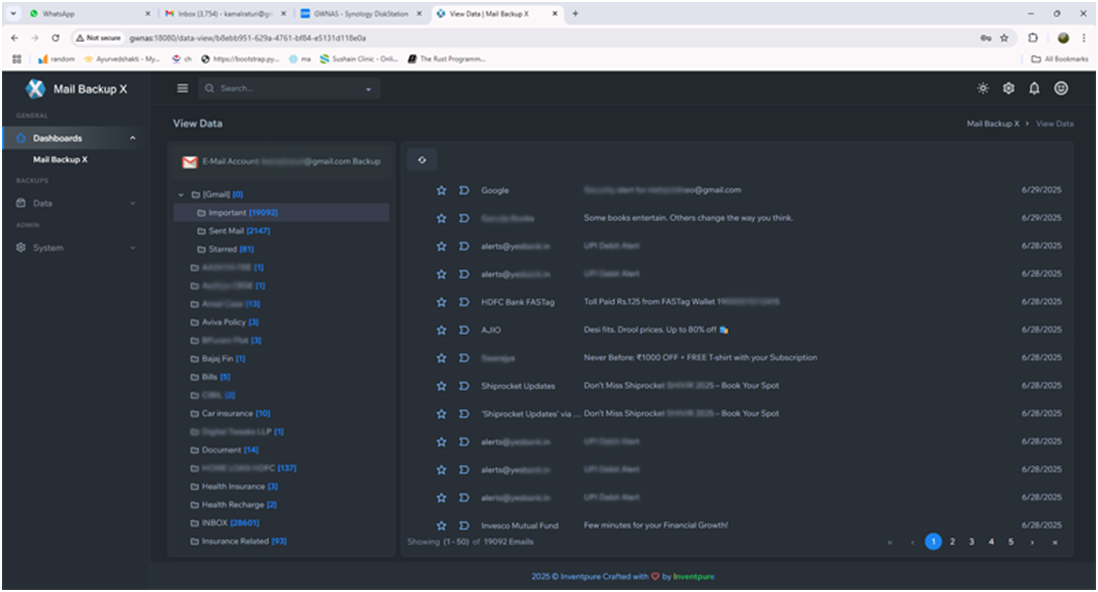
<View-Imported-Emails> And now, your Synology NAS becomes a self-sufficient and automated email archiving platform. Mail Backup X operates independently within its container, pulling in messages based on your settings and writing everything to disk. The system watches for new mail, organizes it, and preserves it continuously.
Over time, this setup produces a complete and verifiable email backups rather than a series of isolated exports. Each sync cycle is logged, failures are visible, and historical data remains intact across software updates or container restarts. This is the practical distinction between manual backups and an automated Email backup on a Synology NAS system: once configured correctly, the workflow no longer requires attention, yet remains observable and auditable when needed.